Run
This page describes how to get Tunarr running with various methods and installation methods.
Docker
docker run \
    -v "$(pwd)"/tunarr:/config/tunarr \
    -e "TZ=America/New_York" \
    -p 8000:8000 \
    chrisbenincasa/tunarr
Or if using docker compose...
version: '3.8'
services:
  tunarr:
    image: chrisbenincasa/tunarr:latest
    container_name: tunarr
    ports:
      - ${TUNARR_SERVER_PORT:-8000}:8000
    environment:
      - LOG_LEVEL=${TUNARR_LOG_LEVEL:-INFO}
      # Replace this with your timezone to ensure accurate guide
      # data and scheduling.
      - TZ=America/New_York
    volumes:
      # Choose a path on your host to map to /config/tunarr. This ensures
      # that restarting the container will not delete your settings or DB.
      - /path/to/tunarr/data:/config/tunarr
Docker Desktop
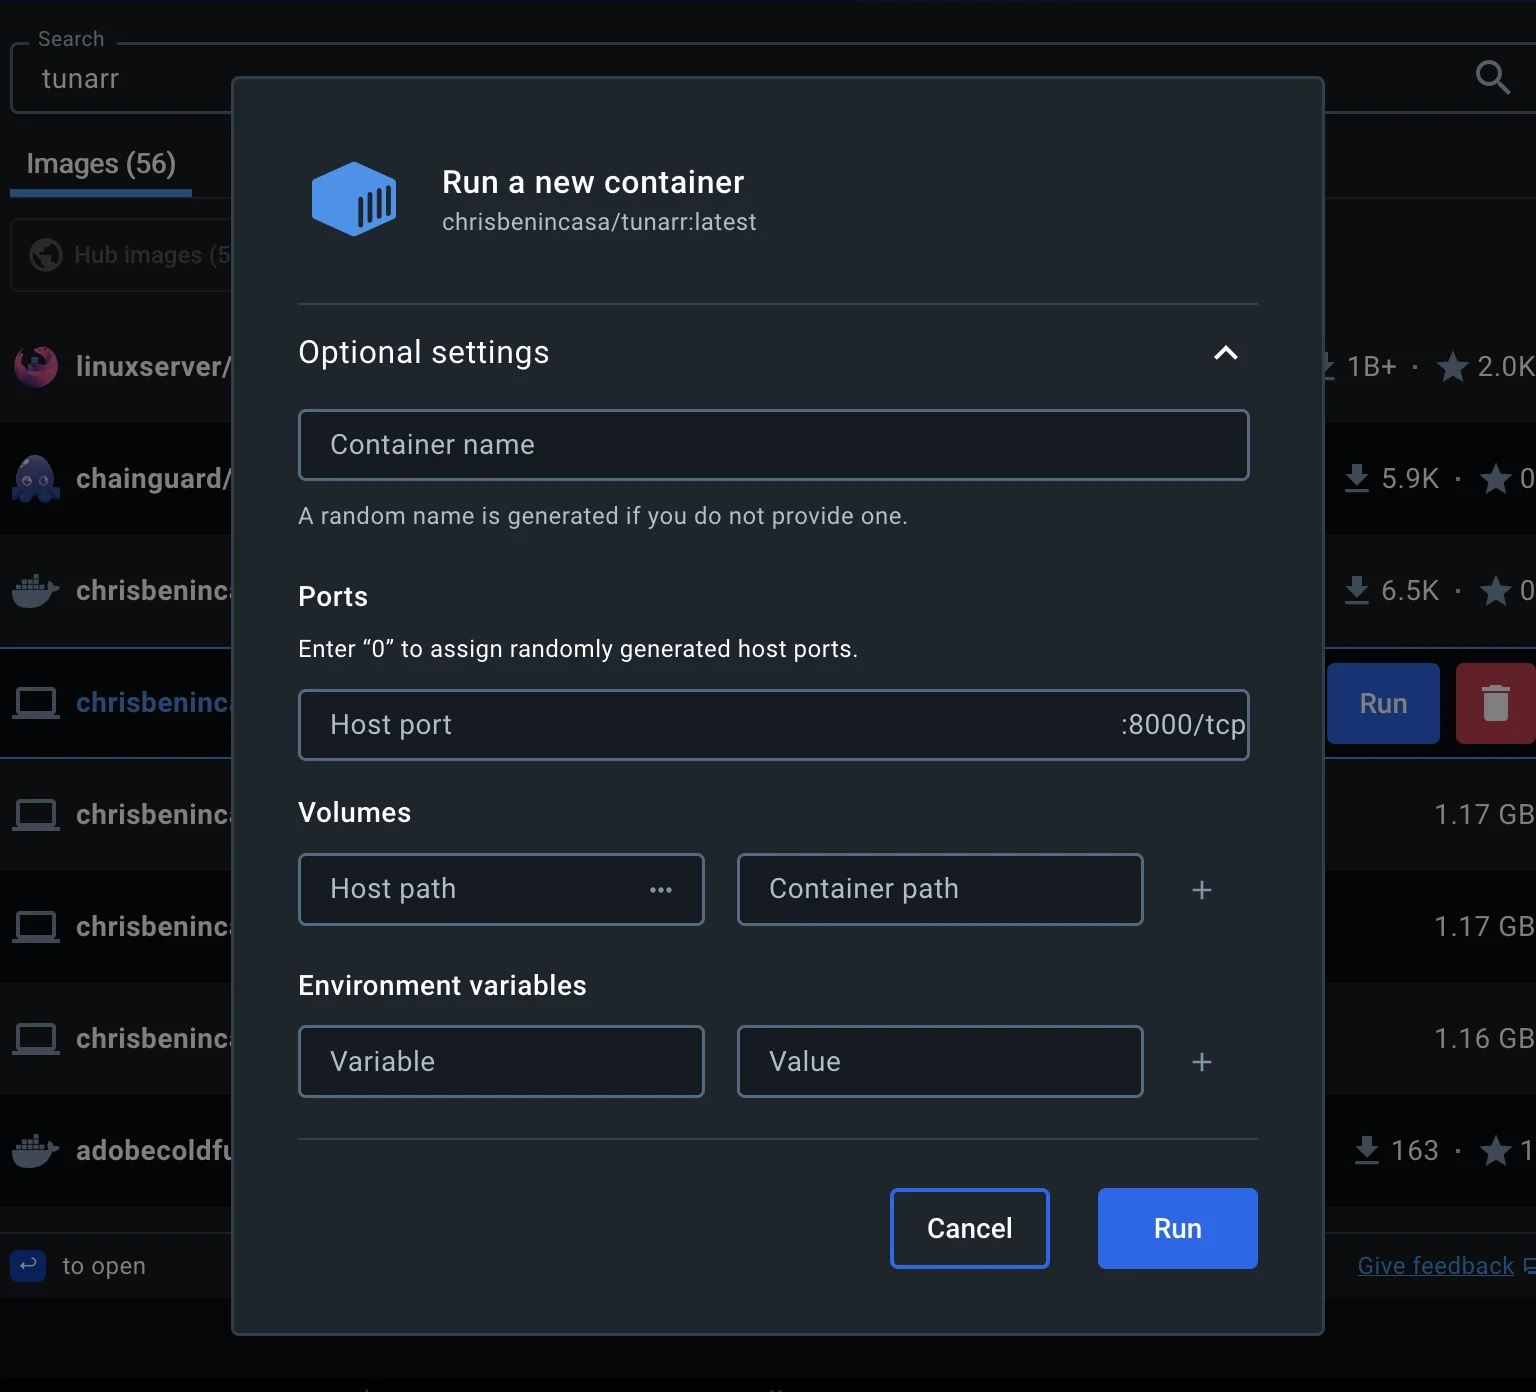
If using Docker Desktop, before running the Tunarr container, you have to use the GUI to configure some of the options mentioned above. This can be done by clicking on the "Optional settings" button. This will show the UI below, where, at the very least, you should configure a volume bind mount (so that your configurations don't get deleted if the container restarts / Tunarr is upgraded). Set the "Container path" to /config/tunarr and the Host path to the path on your system where you want to save Tunarr data. Additionally, expose the port of your choice to access Tunarr, by setting "Host port" to the port of your choice.
Configuration
Tunarr has various command line / environment variables for configuration. These are listed below.
Server
| Environment Variable | Command Line Flag | Default | Description |
|---|---|---|---|
TUNARR_DATABASE_NAME |
--database |
'' |
Sets the path where Tunarr will write its data to. NOTE Do not set this if using Docker; use a bind mount pointed to /config/tunarr instead. |
TUNARR_SERVER_PORT |
--port/-p |
8000 |
Sets the port that the Tunarr server will listen on. NOTE When using Docker, prefer using a port mapping instead of setting this. |
TUNARR_BIND_ADDR |
N/A | 0.0.0.0 |
Sets the interface that Tunarr will bind to. By default, Tunarr listens on all network interfaces. NOTE This generally does not have to be changed. |
TUNARR_SERVER_TRUST_PROXY |
--trust_proxy |
false |
Enables trust proxy for using Tunarr behind a reverse proxy. |
Logging
| Environment Variable | Command Line Flag | Default | Description |
|---|---|---|---|
TUNARR_LOG_LEVEL |
N/A | info |
Sets the log level. Valid values: trace, debug, info, warn, error, fatal, silent. Overrides the UI setting. |
LOG_DIRECTORY |
N/A | (data dir) | Sets a custom directory for log files. |
Streaming
| Environment Variable | Command Line Flag | Default | Description |
|---|---|---|---|
TUNARR_SESSION_CLEANUP_DELAY_SECONDS |
N/A | 15 |
How long to wait before cleaning up a transcode session after the last disconnect |
Search (Meilisearch)
| Environment Variable | Command Line Flag | Default | Description |
|---|---|---|---|
TUNARR_MEILISEARCH_PATH |
N/A | (auto-detected) | Path to the Meilisearch binary. Tunarr will search common locations if not set. |
TUNARR_SEARCH_PORT |
N/A | (random available) | Port for the embedded Meilisearch instance. |
TUNARR_SEARCH_MAX_MEMORY |
N/A | (unlimited) | Maximum memory for Meilisearch indexing (e.g., 1024Mb, 2Gb). See Meilisearch docs. |
TUNARR_SEARCH_MAX_INDEXING_THREADS |
N/A | (all cores) | Maximum threads for Meilisearch indexing. Useful for limiting CPU usage. |
TUNARR_SEARCH_REDUCE_INDEXER_MEMORY_USAGE |
N/A | true |
Reduces Meilisearch memory usage during indexing. See Meilisearch docs. May impact file storage. Not available on Windows. |
TUNARR_DISABLE_SEARCH_SNAPSHOT_IN_BACKUP |
N/A | false |
When set to true, excludes Meilisearch snapshots from backups. The search index will be rebuilt on restore. |
Artwork
| Environment Variable | Command Line Flag | Default | Description |
|---|---|---|---|
TUNARR_PROXY_ARTWORK |
N/A | false |
When set to true, Tunarr proxies artwork requests through itself rather than redirecting clients directly to the media server URL. Useful when clients cannot reach your media server directly (e.g., behind a firewall or on a different network segment). |
Transcoding
| Environment Variable | Command Line Flag | Default | Description |
|---|---|---|---|
TUNARR_TONEMAP_ENABLED |
N/A | false |
Enable experimental HDR tonemapping. When set to true, Tunarr will apply HDR-to-SDR tonemapping when HDR source content is detected. See HDR Tonemapping. |
TUNARR_DISABLE_VULKAN |
N/A | false |
Disable Vulkan-based tonemapping in the CUDA pipeline. Use if Vulkan is not available on your system or is causing stream failures; Tunarr will fall back to software tonemapping. |
TUNARR_DISABLE_VAAPI_PAD |
N/A | false |
Disable hardware pad filters (pad_vaapi/pad_opencl) for VAAPI and fall back to software padding. Use if hardware padding causes artifacts or stream errors on your hardware. |
Performance
| Environment Variable | Command Line Flag | Default | Description |
|---|---|---|---|
TUNARR_USE_WORKER_POOL |
N/A | false |
Enables experimental worker thread pool for background tasks. NOTE This is experimental. |
TUNARR_WORKER_POOL_SIZE |
N/A | (CPU count) | Number of worker threads in the pool. Recommended: no more than the number of CPUs on the host. |
Debug
| Environment Variable | Command Line Flag | Default | Description |
|---|---|---|---|
TUNARR_SERVER_PRINT_ROUTES |
--print_routes |
false |
Prints all server routes at startup. Useful for debugging. |
Hardware Transcoding
Nvidia
There are many ways to enable usage of an Nvidia GPU in a Docker container. The latest, and arguably simplest, method is to install and configure the Nvidia Container Toolkit.
Docker CLI example with Nvidia
docker run \
    --runtime nvidia \
    -v "$(pwd)"/tunarr:/config/tunarr \
    -e "TZ=America/New_York" \
    -p 8000:8000 \
    chrisbenincasa/tunarr
Docker Compose example with Nvidia
version: '3.8'
services:
  tunarr:
    image: chrisbenincasa/tunarr:latest
    container_name: tunarr
    ports:
      - ${TUNARR_SERVER_PORT:-8000}:8000
    environment:
      - TUNARR_LOG_LEVEL=${TUNARR_LOG_LEVEL:-INFO}
      - NVIDIA_VISIBLE_DEVICES=all
      - TZ=America/New_York
    volumes:
      # Choose a path on your host to map to /config/tunarr. This ensures
      # that restarting the container will not delete your settings or DB.
      - /path/to/tunarr/data:/config/tunarr
    deploy:
      resources:
        reservations:
          devices:
            - driver: nvidia
              count: all
              capabilities: [gpu, video, utility]
QSV (Intel) / VA-API (Video Acceleration API)
For QSV compatability in Docker, you must mount /dev/dri the container:
Docker CLI Example
docker run \
  -v "$(pwd)"/tunarr:/config/tunarr \
  --device /dev/dri:/dev/dri \
  -e "TZ=America/New_York" \
  -p 8000:8000 \
  chrisbenincasa/tunarr:latest
Docker Compose Example
version: '3.8'
services:
  tunarr:
    image: chrisbenincasa/tunarr:latest
    container_name: tunarr
    ports:
      - ${TUNARR_SERVER_PORT:-8000}:8000
    environment:
      - TUNARR_LOG_LEVEL=${TUNARR_LOG_LEVEL:-INFO}
      - TZ=America/New_York
    # Pass all render devices to container
    devices:
      - /dev/dri:/dev/dri
    volumes:
      # Choose a path on your host to map to /config/tunarr. This ensures
      # that restarting the container will not delete your settings or DB.
      - /path/to/tunarr/data:/config/tunarr
Standalone binaries
*nix Setup
After downloading the binary from Github, you must re-add executable permissions to the file. In Linux or macOS, this can be done by running
Replace tunarr-linux-64 with the path to the Tunarr binary you downloaded.
Meilisearch Binary
Important
Tunarr releases include a packaged Meilisearch binary (meilisearch or meilisearch.exe on Windows) alongside the main Tunarr executable. You must keep the Meilisearch binary in the same directory as the Tunarr binary. Tunarr will not start properly if it cannot locate this file.
When moving or installing Tunarr, always ensure both binaries are kept together.
Run as a service
It's recommended to run Tunarr as a service / background task. Below are examples depending on your host OS.
systemd (Linux)
Below is a sample systemd service definition that can be used as a starting point to running Tunarr via systemd on Linux.
Setup:
- In terminal, execute
sudo mkdir /opt/tunarr/ - Execute
sudo mkdir /opt/tunarr/streams - Execute a
sudo mv tunarr-linux-x64 /opt/tunarr/tunarr-linux-x64(replace the first path with the path you downloaded Tunarr too, which will include the version) andsudo mv meilisearch /opt/tunarr/meilisearch - NOTE: On each update, you must replace BOTH the Tunarr and Meilisearch binaries in this directory.
- Execute
sudo nano /etc/systemd/system/tunarr.service - Copy and paste the service definition below:
[Unit]
Description=Tunarr
Wants=network-online.target
After=network-online.target

[Service]
Type=simple
WorkingDirectory=/opt/tunarr
ExecStart=/opt/tunarr/tunarr-linux-x64
ExecReload=pkill -INT tunarr-linux-x64
ExecStop=pkill -INT tunarr-linux-x64
KillMode=process
Restart=always
RestartSec=15

# Replace these values!
User=YOUR_USER
Group=YOUR_GROUP

StandardOutput=journal
StandardError=journal

[Install]
WantedBy=multi-user.target
- Execute a
ctrl+o, on the keyboard. When prompted to save the buffer, press Enter to save and exit. - Execute
sudo systemctl daemon-reload - In terminal, execute
sudo systemctl enable tunarr.service - Execute
sudo systemctl start tunarr
launchd (macOS)
Save the following launchd configuration to ~/Library/LaunchAgents/tunarr.xml. Replace /Path/to/tunarr with the directory path in which you installed Tunarr. We recommend moving this to somewhere stable (i.e. out of your Downloads folder) like $HOME/.local/bin
<?xml version=“1.0” encoding=“UTF-8”?>
<!DOCTYPE plist PUBLIC “-//Apple//DTD PLIST 1.0//EN” “http://www.apple.com/DTDs/PropertyList-1.0.dtd”>
<plist version=“1.0”>
<dict>
    <key>Label</key>
    <string>com.tunarr.server.app</string>
    <key>Program</key>
    <string>/Path/to/tunarr/tunarr</string>
    <key>WorkingDirectory</key>
    <string>/Path/to/tunarr</string>
    <key>RunAtLoad</key>
    <true/>
    <key>KeepAlive</key>
    <true/>
    <key>StandardErrorPath</key>
    <string>/Path/to/tunarr/error.log</string>
    <key>StandardOutPath</key>
    <string>/Path/to/tunarr/output.log</string>
    <key>UserName</key>
    <string>USER_TO_RUN_TUNARR_AS</string>
    <key>HOME</key>
    <string>/Path/to/home</string>
</dict>
</plist>
NSSM (Windows)
NSSM is the recommended way to run Tunarr as a background task in Windows. It is recommended to configure NSSM to run Tunarr as the currently logged in user.
- Download NSSM from its website. The latest version is recommended because it is more compatible with the latest versions of Windows.
- Once unzipped, you will obtain the
nssm.exefile (insidewin64folder). Create a folder callednssmand place thenssm.exefile inside it. Then move this folder to theProgram Filesfolder. The final path for NSSM will be:C:\Program Files\nssm\nssm.exe - Insert the NSSM file into the Windows environment variables. If you already know how to do this, skip directly to step 6.
- Open the start menu and type “Path.” At this point, “edit system environment variables” will appear in the search. Click on it and a new window will open with the words “environment variables...” at the bottom. Click on it.
- Another window will open and in the upper section we will need to select “Path” and then click on “Edit.” In this last window that opens, we will click on “New” and enter this path:
C:\Program Files\nssm. Now we can click on OK and close all the other windows that were previously open by clicking on OK again. - Open "Command Prompt" as administrator, type
nssm install, and press enter. The nssm configuration window will open. What we are interested in for now is filling in some fields in the ‘Application’ and “Details” tabs. - The first field to fill in is the service name at the bottom, in our example the name entered will simply be “Tunarr”.
- Assuming you've placed our
tunarr.exein the following path:C:\Program files\tunarr\tunar.exe, in the “Application” tab, simply copy and paste the entire path, including .exe, into the “Path” field. If you have Tunarr in a different location, use that path instead. - In the “startup folder” field, enter only the path to the folder, so in our example it will be
C:\Program files\tunarr(without quotation marks). The “arguments” field can be left blank, but if you need a different port at this stage that you have not yet changed within Tunarr, you can add--port 8001to change the port to 8001, or one of your choice (useful when using a program, such as dizqueTV, that has already occupied port 8000). - Now go to the “Details” tab. Everything here is less important. Just enter “Tunarr” in the “Display name” field and something of your choice in the ‘Description’ field. Leave the startup type set to “Automatic.”
- Click on “Install service” and Tunarr will finally be installed as a service
Updating Tunarr within NSSM
From now on, to update tunarr, we will first have to stop the service. 1. Click on the start menu and search for “services”. Click on the result. 2. On the next screen with the list of all services, right-click on Tunarr and click on “stop.” 3. Replace the .exe file with the updated executable, return to the services screen, right-click on Tunarr, and select “start”
Converting Tunarr to an NSSM service
If you are converting from a previously used Tunarr, please note that the main Tunarr folder will now be moved to another location, so the new Tunarr that starts will actually behave as if it were a new installation. To restore the entire configuration, you will need to copy the contents of the Tunarr folder in the path usually used by the program %appdata%\ tunarr and paste it into the following location: C:\Windows\System32\config\systemprofile\AppData\Roaming\tunarr
This will be the new location for the database, channels, and everything else (obviously, this must be done after stopping the tunarr service and then restarting it as explained above).